
Sorry I wasn't able to do a post for yesterday, but I just wanted to rest up a bit and then spend the rest of the time playing with my dies. I wanted to find out which of the border dies could be 'grown' to make deeper borders. Boy did I have some fun and I think you will agree the results were worth the wait. Now, before I get started, I am not very good at wording things these days, brain too fuzzy with all the meds, but I have done some pictures to go along with the explanations so hopefully you will get the gist of my creations.
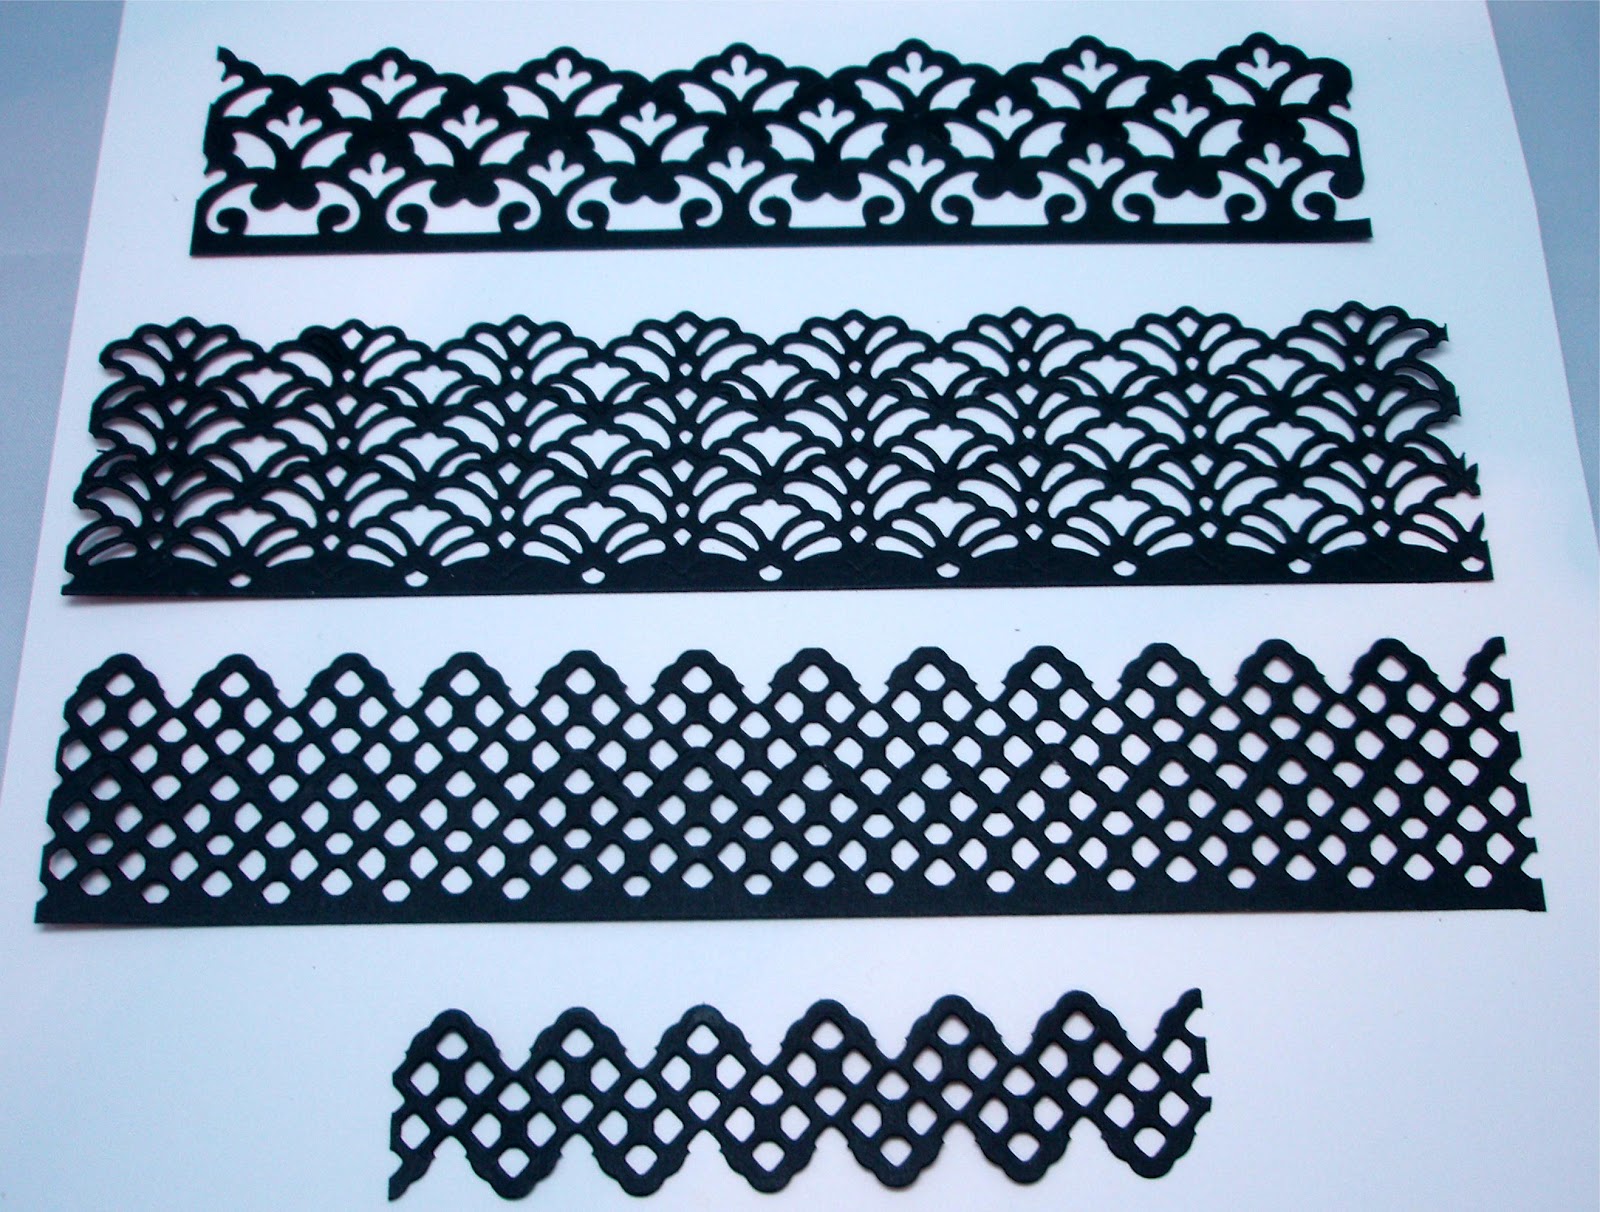
First here are all the 'grown' borders
Now I will break each one down and hopefully you will see the cutting process a bit clearer. I promise it is alot easier that you may think and even the gluing is simple to do.
First its the new Vintage Lace Accents border:-
These new die sets by Sue Wilson Designs are beautiful, but I must say this border is amazing, especially when 'grown' as I now call it. 
First we have the actual die
Then 3 layers, cut and glued together
The original die size for comparison

The black pen marks show which bit to cut away. By cutting carefully here, none of the lower border will show in the finished piece. Do this as many times as you want extra layers to your border.

Here is a extra close-up view showing the position of the cuts to be made.
(If you cut it carefully, it actually makes a nice border on its own also.)
Now to the Lace Doily Accents border:-

This is only 2layers deep and it is still very impressive.
This is the original size with the bottom cut away....see next picture..
This is a gorgeous border in its own merit don't you think?!

When you have cut your second and any futher layers of the border, turn it/them around in the die and cut again, this will cut away the black heavy base and shape it to match the top, making it easy to glue to the previous layer/s.
Finally, we have Parisian Accents:-

First the die itself, of course
The deep border here is made up of 3layers. Gorgeous don't you think?!
The original size of the diecut, for comparison.
 Finally, the cutting guide and gluing position.
First take off 1.5mm right across the bottom of the border in your guilotine or trimmer (or with scissors if you prefer). Next cut straight down between the curl and the upright on both sides as shown. The shaded area must all be cut away so that none of the base shows in the finished border.
So what do you think. Have I come up with something useful for you too? I have a little added something up my sleeve too, but you will have to wait to see my next card for that. It is only a small thing but it does create a nice effect.
Well that's it for my lastest tips and tutorial. I do hope you like some of my lastest creations and will find them useful in your own crafting.
I have one favour to ask please before I go: I have worked hard finding ways to create all these items, so if you use any of them in your creations/projects would you be kind enough to give credit to me and maybe even a reference or link to my blog. Thank you so much.
I hope you all have a good day. The weather outlook is very grim for today and at 6am now, the rain is already pouring down and the wind has picked up too. Yuk!!
Best wishes Linda xx
Hi Linda,
ReplyDeletethank you for the tutorial on the borders. I found it very interesting, although I only have the parisian dies at the mo. I just love the border with the vintage lace though a real must have. When the weddings over I will buy. Pity I didn't have them to do the wedding cards, never mind I'll manage without them boo hoo. I'm glad you got some rest yesterday and had some me time, for a change. Sorry to hear it's raining there I got up and it's nice and sunny. We had the wind and rain last night, but as I'm writing this it's come over all cloudy and black again. Have a great crafty day everyone.
Lots of crafty love. Jenny L.
Stunning tutorial don`t have the sue wilson`s new dies yet,have always wanted to now how to due this Thanks, sunny here first lot of washing on line
ReplyDeleteHi Linda
ReplyDeleteLike Jenny I only have the Parisian and Damask dies, but I really love them. Later today I am really going to play with the Parisian border because I use it a lot. Thank you so much for working this out and showing it to us!
The rain has eased off at the moment but the sky is very heavy and lots of black clouds!!!
Hope you get some rest today.
love from Christine x
Morning Linda, Found your site via comments about your Blog on Sue's Blog and I have now joined yours. What a fantastic tutorial Linda, thank you so much for sharing this with us all, they look brilliant done this way. I would never have been able to do this, but with your expert tips maybe now I can. It is black outside here and the rain is coming down like 'stair-rods'. I will be giving your tips a try out later, thanks once again. Lots of love from Patricia xx
ReplyDeleteHi Linda, I only have the Parisian die too, but will definitely use your tutorial on a card..:) It's given me an idea to use with the Heartfelt Creations Lace Border..That one is already quite deep, but I will be looking to make it twice as deep now..:) Thanks for your inspiration and easy to follow tutorial..Don't know how to link etc but will ask you when I've made a card using your method..:)..Enjoy your day...xx
ReplyDeleteWhat a brilliant idea, I don't have any of the dies you mentioned as I only have border punches, but can see how it could be adapted.
ReplyDeleteThanks
Suzie xx
Super tutorial Linda! Carole Z X
ReplyDeleteA great tutorial Linda, thanks for taking the time to document the proceedures. Good photographs too. Anne x
ReplyDeleteLove this tutorial Linda especially as it is easy to follow!! The results are really spectacular and I will definitely be trying this out. You are so kind to share your knowledge and it is appreciated.
ReplyDeleteHugs Sue P xx
PS Here in Nottingham it was really dull and pouring down earlier this morning, it does look as if it is trying to brighten up - then again as I am in my craft room I don't really care LOL!!!!
Hi Linda, I love the tutorial. have you tried mixing the borders? I wonder how that would work,will give it a go and let you know, or if you try first let me know. Take care, have a good weekend, best wishes, Lesley xx
ReplyDeleteFabulous tutorial Linda. Thanks for taking the time and effort to have a play with the dies and sharing with us!
ReplyDeleteSarah x
Wow Linda what a fantastic tip , I must try this well done for thinking outside of the box ...Hugs Elaine
ReplyDeleteHi Linda ref my card with the cushions, I used the Serif program to make the backing then imported images of cushions from my computer that I got from cajoline scrap freebies, I have had them some time,and they may not be available still ,but its a good site for freebie images in 300DPI.Hugs Elaine
ReplyDeletehttp://cajoline-scrap.blogspot.co.uk/search/label/FREEBIES
Evening Linda, sorry a late comment but I have been away from home today attending a funeral.
ReplyDeleteThis tutorial is fantastic and the explanations so clear. Thank you for sharing your ideas with us and for all the inspiration. I haven't got these dies but will have a play with others I have. Hope you have had a good day all round despite the weather. Hugs Christine H xx
Hi Linda, I love what you have done with those dies. It really does look like delicate back lace. Oh dear, yet another die to add to my never-ending wish list!!
ReplyDeleteThanks again for your lovely comments on my cards, you are so kind.
Take care of yourself
Hugs Sue
Excellent! Absolutely brilliant tutorial and the results are fantastic :) xx
ReplyDelete