Hiya,
It's really good to be back with you again today. As promised I have another tutorial for you. It may not be for all of you, but I hope it will be useful to some.
Todays tutorial is to create a Slider Box for your Decorative Pins (though it could be adapted for other uses).
Here is the finished article.
and all its components.
Once I had designed the box to suit my Fancy Decorative Pins, I used the fabulous Spellbinders packaging (again, you say? Yes, it's becoming an essential piece of my kit!), to make a template. Much easier than measuring when you have several to make and I had 15 to do straight off ready for giveaways and Candy prizes.
1. Cut out the Box Slider 18.4cm by 10.3cm. Score from each end, along the width, at 1.25cm, 2.5cm and 3.75cm. Then along the length at 1.25 on both sides. (Here you can see the acetate template I made on top of the card already cut to size.)
2. Cut down the score line of the long sides until you reach the 3.75cm score line on all four sides.
3. Fold the long sides up and push the cut flaps into the center. Next, fold over the shorter ends to encapsulate the end flaps and secure the box.
4. Cut the Box Slider liner to 7.6cm by 10.2cm
(Please, please, please excuse my awful writing, I was rushing when I created the templates and didn't have the time to produce tidier ones to show you. I didn't want to risk leaving it until another day incase I was away from the blog again for a short while)
5. Cut the Box Slider Pin Holder to 7.6cm by 11.2cm.
Score at 1.6cm (Sorry, I've just realised I wrote 1.5 on the template) and at 2.8cm and 4cm.
Fold the 1.6cm and 4cm scores as valley folds and the 2.8cm score as a mountain fold.
6. Attach the Pin Holder to the Box Liner up to the 4cm fold. Next attach only the 1.6cm piece to the base of the Box Liner allowing the extra card to form a mountain in which to secure the pins.
7. Cut out the Box Outer Slider to 10.6cm by 19.7cm.
Score, from one end, at 0.9cm, 9cm, 10.25cm and 18.4cm.
If you want an aperture, decide on the diecut shape you want and position so the center is at approx 4cm (or to suit your needs).
8. Cut a piece of acetate (recycle that Spellbinder or other packaging again) to fit inside the box and glue it in position along the bottom and top edge. This acetate acts as a perfect window in the aperture, but it also strenghthens the box and stops the pins from damaging the box front.
9. Finally Glue the shorter flap behind the opposite end flap to form the Outer Cover, press firmly from inside to secure.
Now to the adhesive. I used Redline tape for securing the Outer cover but a wet glue could just as easily be used. For the acetate, I used a simple 3mm tape and for the inner Pin Holder and liner, I used a few drops of wet glue.
I have displayed the finished box with only four pins, but it will infact hold up to seven pins; it depends totally on the size of the beads used. I have made up a few of these boxes ready for gifts or Candy and also to store some of my own pins. They provide much needed protection if I have used speciality beads on my pins and it stops the pins rubbing together.
Well, there we have it, another Tutorial complete. I do hope it will be
of some use to those of you who love to make pins as I do and also to those who are going to have a go sometime soon.
I will be around blogland again today, trying hard to catch up with you all.
I hope you have a wonderful day. Best wishes Linda xx
Showing posts with label Tutorial. Show all posts
Friday, 17 August 2012
Thursday, 16 August 2012
Tutorial as planned
Good morning all,
Well at last I managed to find enough time to get to the craftroom and do the tutorial I planned. Infact I have done two, so look out tomorrow for the second one! I have included this with all my Tutorials for future reference. Just click on the Tutorials Tab at the top of my home page and you will find a myriad of useful and helpful ideas, not only from myself and also from other crafters that have really impressed me.
Todays tutorial is simple but so useful and it is a bit of upcycling too. So what is it? Well, do you remember the last card I made? Ok, no jokes now, it's not been that long...LOL!! I used this technique to create that card. Here's a reminder for anyone that may have missed it....
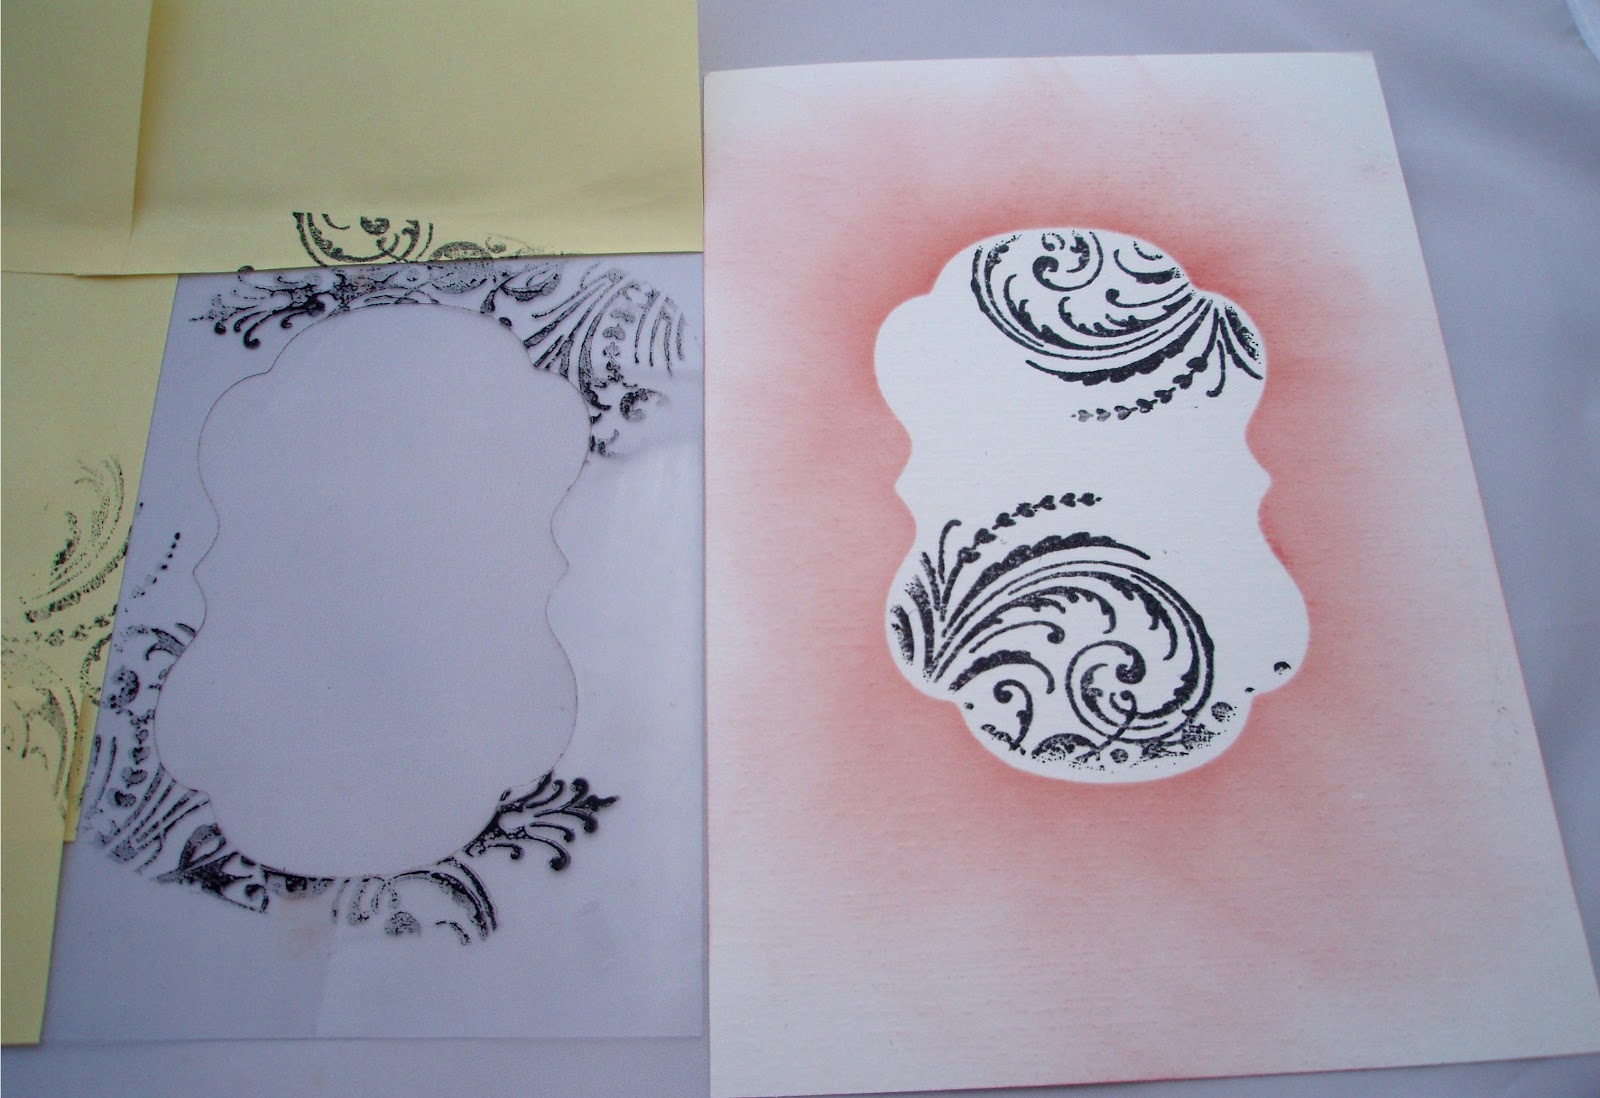
What I want to show you is another way to use your packaging from Spellbinders or other flat acetate packaging; and it includes using the dies that came in the packaging too! So two birds, one stone scenario, good aye!
When you cut your packaging from the dies take care to cut it as close to the curves as possible to create the biggest flat sheets of acetate as possible, it makes it easier for larger dies. Now all you have to do is decide which shape you want to cut first.

USING THE APERTURE OR WASTE PIECE
Step One: Cut your die shape from the acetate. Try to center your die on the acetate before putting it through your GC, Cuttlebug, Big Shot etc; this will be beneficial when using the template.
(Sorry about the glare on the acetate but I had to have it so the acetate would show up.)

Step Two: Adhere your acetate in the correct position using tiny bits of removeable tape. I then used some sticky notes to protect any uncovered cardstock. Next, using your preferred tool, apply your ink of choice and swirl it through the aperture until the required depth of colour is attained. Add deeper tones to the outer edges if you want to create a center soft focus effect. (Sorry mine is shown after I have stamped as I forgot to photograph it before!)

Step Three: Remove the acetate and then stamp over the ink shape with your chosen stamp. Take care to clean your acetate now with a wet wipe or just a damp cloth, dry and store till next time.
STORING YOUR TEMPLATES. Write the die name on the acetate with a permanent marker and store them in polypockets in an A4 file. Arrange them in the same order as your dies are stored to make searching easy.
USING THE DIECUT SHAPE
Step One: Adhere the acetate diecut to your chosen cardstock with tiny bits of removeable tape and then with your ink applicator apply the ink all around in a small circular motion or with outward sweeping strokes.
(I have done this purely for the demostration not for an actual card, so it is unfinished)
Step Two: Remove the die to expose the open shaped area and clean the acetate with a wet wipe or damp cloth. Dry and store as above.
Step Three: Using your Aperture (waste) piece of acetate, place it over the shape and stamp through the aperture, taking care to press all over the stamp to ensure the image reaches the outer edges.
Step Four: Remove the acetate, clean as before and then use your finished design as desired. (I am going to cut mine down now to enclose all the red inked area and use it as a backdrop to a sentiment on a Spellbinders Fancy Tag) Perfect, a background and matt all in one!
I do hope you like my little tutorial and will have a play yourself. It is wonderful the things you can do with bits of old plastic, ink and some inspiration. I'd love to see what you do, so maybe you could let me know if you use this techinique at any time and I could take a look.
Well, have a good day and stay crafting!! (Oh lord, I am getting to sound like Bruce Forsyth.....LOL!!) See you soon Linda xx
Well at last I managed to find enough time to get to the craftroom and do the tutorial I planned. Infact I have done two, so look out tomorrow for the second one! I have included this with all my Tutorials for future reference. Just click on the Tutorials Tab at the top of my home page and you will find a myriad of useful and helpful ideas, not only from myself and also from other crafters that have really impressed me.
Todays tutorial is simple but so useful and it is a bit of upcycling too. So what is it? Well, do you remember the last card I made? Ok, no jokes now, it's not been that long...LOL!! I used this technique to create that card. Here's a reminder for anyone that may have missed it....
What I want to show you is another way to use your packaging from Spellbinders or other flat acetate packaging; and it includes using the dies that came in the packaging too! So two birds, one stone scenario, good aye!
When you cut your packaging from the dies take care to cut it as close to the curves as possible to create the biggest flat sheets of acetate as possible, it makes it easier for larger dies. Now all you have to do is decide which shape you want to cut first.

USING THE APERTURE OR WASTE PIECE
Step One: Cut your die shape from the acetate. Try to center your die on the acetate before putting it through your GC, Cuttlebug, Big Shot etc; this will be beneficial when using the template.
(Sorry about the glare on the acetate but I had to have it so the acetate would show up.)

Step Two: Adhere your acetate in the correct position using tiny bits of removeable tape. I then used some sticky notes to protect any uncovered cardstock. Next, using your preferred tool, apply your ink of choice and swirl it through the aperture until the required depth of colour is attained. Add deeper tones to the outer edges if you want to create a center soft focus effect. (Sorry mine is shown after I have stamped as I forgot to photograph it before!)

Step Three: Remove the acetate and then stamp over the ink shape with your chosen stamp. Take care to clean your acetate now with a wet wipe or just a damp cloth, dry and store till next time.
STORING YOUR TEMPLATES. Write the die name on the acetate with a permanent marker and store them in polypockets in an A4 file. Arrange them in the same order as your dies are stored to make searching easy.
USING THE DIECUT SHAPE
Step One: Adhere the acetate diecut to your chosen cardstock with tiny bits of removeable tape and then with your ink applicator apply the ink all around in a small circular motion or with outward sweeping strokes.
(I have done this purely for the demostration not for an actual card, so it is unfinished)
Step Two: Remove the die to expose the open shaped area and clean the acetate with a wet wipe or damp cloth. Dry and store as above.
Step Three: Using your Aperture (waste) piece of acetate, place it over the shape and stamp through the aperture, taking care to press all over the stamp to ensure the image reaches the outer edges.
Step Four: Remove the acetate, clean as before and then use your finished design as desired. (I am going to cut mine down now to enclose all the red inked area and use it as a backdrop to a sentiment on a Spellbinders Fancy Tag) Perfect, a background and matt all in one!
I do hope you like my little tutorial and will have a play yourself. It is wonderful the things you can do with bits of old plastic, ink and some inspiration. I'd love to see what you do, so maybe you could let me know if you use this techinique at any time and I could take a look.
Well, have a good day and stay crafting!! (Oh lord, I am getting to sound like Bruce Forsyth.....LOL!!) See you soon Linda xx
Saturday, 23 June 2012
More creative ideas -Embellishments
Hi all,
For those of you who like me enjoy creating your own embellishments, I have a few more ideas to help you design some unique pieces for your cards or projects.
I love all the bling and dressy bits we can add to our cards. Even if it is only to add to the center of a fancy bow, a little bit of bling can really finish off a card. However, these types of items can come at a premium price and you often don't get alot for your money. I have seen a card of embellishments similar to these for well over £5. I managed to create these from items in my stash and findings and they would cost well under £1.50 (I cannot give an exact costing as it depends on the cost of brads. I bought mine so long ago that I can't remember the exact price). That is a vast difference in price, so an attempt at making our own seems sensible don't you think?
So what do we need to start these? Well the first thing is obvious isn't it: brads. If you haven't got any fancy ones in your stash, don't worry use half pearls or rhinestones and just glue them together (use either jewellery glue or the Incredibly Tacky glue).
The other items that can be used are Bead Caps, broken bits of earrings etc.. Have a look at what you have or can find cheaply (I found alot of my earrings for breaking up at the 'What' bargain store here in the UK. A pair of earrings at only £1.50 broke down into more that 10 bases for other embellishments.
These little trinkets can be as addictive to make as Decorative Pins, so be warned. You find yourself looking for all the bargains at the stores and checking through all your broken jewellery just to find something new or exciting.
Pearly or rhinestone ribbon sliders. These are 13mm in diameter.
Check out the fancy shaped earring pieces too. For this one I just used my jewellery snips to cut off the V at the top and bottom to make it symmetrical (see above picture).
Size = 14 x 25mm.
I flattened filigree Bead Caps (8x10mm). Ease each leg down and then flatten into the centre with chain nose (flat nosed) jewellery pliers. Be gentle, you don't want to snap them off.
Flatten size = 2cm in diameter.
Smaller filigree or daisy bead caps work just as well. They come in a variety of sizes. The smallest I have used is 5x7mm filigree (silver in picture above)
Flatten size =13mm in diameter.
The final beadcap is made to fit a 14mm bead.
Flattened size = 18mm in diameter.
One other thing that is very useful is a bead reamer or very narrow file. Mine is from a set made by Basic Grey called Precision File Set. They are made for distressing and included are a narrow square file and a round file. These are essential if you need to make the holes bigger in the center of your base pieces (ie. flattened beadcap) for the brads to go through.
Ok, so that's it for another idea post. I do hope you can find something useful in all my ideas.
Do you have any ideas or tips that you would like to share? If so email me and I will get them on a post asap.
This is the one thing I absolutely adore about crafting, the sharing! I love being able to share with you and love to read and learn from other crafters too. So if you do have any tips or tricks that you think could help me and our lovely followers/readers please don't be afraid to let me know. If I get enough I can do a post dedicated to just Readers Tips,Tricks and Techniques.
Have a wonderful day all. I will be back with a card soon so I hope you can pop by again and give me your opinion.
Bye for now Linda xx
For those of you who like me enjoy creating your own embellishments, I have a few more ideas to help you design some unique pieces for your cards or projects.
I love all the bling and dressy bits we can add to our cards. Even if it is only to add to the center of a fancy bow, a little bit of bling can really finish off a card. However, these types of items can come at a premium price and you often don't get alot for your money. I have seen a card of embellishments similar to these for well over £5. I managed to create these from items in my stash and findings and they would cost well under £1.50 (I cannot give an exact costing as it depends on the cost of brads. I bought mine so long ago that I can't remember the exact price). That is a vast difference in price, so an attempt at making our own seems sensible don't you think?
So what do we need to start these? Well the first thing is obvious isn't it: brads. If you haven't got any fancy ones in your stash, don't worry use half pearls or rhinestones and just glue them together (use either jewellery glue or the Incredibly Tacky glue).
The other items that can be used are Bead Caps, broken bits of earrings etc.. Have a look at what you have or can find cheaply (I found alot of my earrings for breaking up at the 'What' bargain store here in the UK. A pair of earrings at only £1.50 broke down into more that 10 bases for other embellishments.
These little trinkets can be as addictive to make as Decorative Pins, so be warned. You find yourself looking for all the bargains at the stores and checking through all your broken jewellery just to find something new or exciting.
Pearly or rhinestone ribbon sliders. These are 13mm in diameter.
Check out the fancy shaped earring pieces too. For this one I just used my jewellery snips to cut off the V at the top and bottom to make it symmetrical (see above picture).
Size = 14 x 25mm.
I flattened filigree Bead Caps (8x10mm). Ease each leg down and then flatten into the centre with chain nose (flat nosed) jewellery pliers. Be gentle, you don't want to snap them off.
Flatten size = 2cm in diameter.
Smaller filigree or daisy bead caps work just as well. They come in a variety of sizes. The smallest I have used is 5x7mm filigree (silver in picture above)
Flatten size =13mm in diameter.
The final beadcap is made to fit a 14mm bead.
Flattened size = 18mm in diameter.
One other thing that is very useful is a bead reamer or very narrow file. Mine is from a set made by Basic Grey called Precision File Set. They are made for distressing and included are a narrow square file and a round file. These are essential if you need to make the holes bigger in the center of your base pieces (ie. flattened beadcap) for the brads to go through.
Ok, so that's it for another idea post. I do hope you can find something useful in all my ideas.
Do you have any ideas or tips that you would like to share? If so email me and I will get them on a post asap.
This is the one thing I absolutely adore about crafting, the sharing! I love being able to share with you and love to read and learn from other crafters too. So if you do have any tips or tricks that you think could help me and our lovely followers/readers please don't be afraid to let me know. If I get enough I can do a post dedicated to just Readers Tips,Tricks and Techniques.
Have a wonderful day all. I will be back with a card soon so I hope you can pop by again and give me your opinion.
Bye for now Linda xx
Wednesday, 16 May 2012
Change of Plans - New Pins
I am so sorry folks, something happened and my post didn't show, so here it is a bit late....
Good morning all
Good morning all
I know I said yesterday that I would do a CASE card today, but I have been promising all those with Starter Kits (purchased or Candy wins) that I would create new pins and put them up on the blog for more inspiration. Of course I hope anyone making a start on their own pins will find some inspiration within my blog; I have tried hard to provide a large variety of styles and designs.
So with this in mind, today I would like to show you the pins I have recently completed. I have been able to create these while sat on the sofa when I have been uncomfortable and unable to go up to my craftroom. It meant I was still able to craft, just a little more carefully (I have in the past spilled drops of glue on the riser of my reclining sofa....Aaarggg was I cross with myself!!)
In these new designs I have tried to cover a variety of issues to allow for greater usage of the pins and also to allow for those of you who may only want to use long dressmaking pins etc. You will also see some other gemstones within the designs; these I have taken from broken necklaces and bracelets that I no longer wanted to repair and use, so I recycled again......... I am a really good recycling girl you know, just the other day I had a stack of dusty polystyerene dishes that needed throwing out, but I cut them up and I am now using the bases for padding under fabric etc for 3D effect. Will find other uses yet, you'll see!!....can't let something good go to waste now can I? LOL :)
Anyway back to the pins, I am including a list of items used in the make up of each pin and I will also put a link to this post in the Tutorials Tab to make it easy for you to find at any time..
I have already made up and sent out some Starter Kits (besides the freebie Candy ones) and if anyone else is interested please email me and I will get back to you asap. You can also purchase readymade pins, just email me the numbers of the ones you prefer or just say MIX and the number required and I will send you costing. Lets go then:-
Notes before I start:- LP is LongPin, SP is Short Pin.
Head is the length of beads on the pins - all approx sizes
Set No.1
Pin A - SP, 4mm pearls, 4mm daisy spacers, 3mm smooth metal spacer beads & 4mm crystal rondells (A super slim pin with a head of approx 1" - would suit small cards etc)
Pin B - LP, 5x7mm filigree beadcone, (2)6mm pearls, 4mm pearl, rhinestone rondell, (2)6mm beadcaps, 4mm daisy spacer, 3mm smooth metal spacer bead (A slim pin but thicker than Pin A, head is just over 1" - would suit cards up to 5x7")
Pin C - LP, 5x7mm filigree beadcone, 8mm & 6mm pearls, 6 & 7mm beadcaps, 4mm daisy spacer, 8mm cup beadcap, 5mm smooth metal spacer bead (Similar to Pin B)
***********************************************************************************
Set No.2
PIN D - SP, 4mm crystal rondell, 6mm filigree bead, 8mm pearl, (2) 7mm beadcaps (Small head of 1inch, but chunkier than Pin A)
PIN E - SP, 8mm cup beadcap, 4,6,8mm pearls, 7mm beadcap, 5x7mm beadcone, 4&6mm daisy spacers (Top heavy pin, head approx 1.25", would suit just about any card)
PIN F - SP, 3&4mm smooth metal beads, 6mm pearl, 10x14mm black gemstone, (2) 4mm daisy spacers, (2) 7mm beadcaps (Short head of approx 1" but chunky and shows well)
**************************************************************************************
Set No.3
PIN G - LP, 5X7mm beadcone, (2) 6mm filigree bead, (2) 6mm daisy spacers, 10mm bicone bead, 4mm smooth metal spacer bead. (Slimline but chunky central bead, head approx 1.5", suit most cards)
PIN H - LP, 5x7mm beadcone, (2) 6mm daisy spacers, 6 & 8mm pearls, (6) 6mm beadcaps, 12mm metal round doughnut connector bead, 5mm smooth metal spacer bead. (Same as Pin G)
PIN I - LP, 5X7mm beadcone, 6mm crystal rondell, 8x14mm gemstone, 10x8mm gemstone, 8mm cup beadcap, (2) 7mm beadcaps. (Short head of just over 1", slimline with chunky base gemstone, would suit cards up to 8x8")
*************************************************************************************
Set No.4 (All three pins have heads over 1.25", chunky design that would suit any card)
PIN J - SP, 3&4mm smooth spacers beads, 6mm filigree bead, 6x8mm faceted teardrop, 6mm beadcap, 6mm faceted rondell, 5mm faceted round bead, 4mm daisy spacer.
PIN K - LP, (2) 5x7mm beadcone, 6mm filigree bead, metal heart connector bead, (2) 2.5mm &3mm smooth metal spacers beads, 4,6&8mm pearls, (2)4mm daisy spacers, 6mm daisy spacer,
PIN L - LP, 3&4mm smooth metal spacer beads, 6mm bicone bead, 8mm glitter bead, (2)4mm daisy spacers, (2) 6mm daisy spacers, (2) 6mm beadcaps.
**************************************************************************************
Set No.5 (All pins have heads over 1.5" and would suit any size card)
PIN M - SP, 3,4 &5mm smooth metal spacer beads, (3) 6mm pearls, (4) beadcaps, 4&6mm daisy spacers, 14mm metal puffed bead.
PIN N - LP, 6mm beadcap, 8mm cup beadcap, 10x16mm gemstone, 8x20mm beadcone, 4mm smooth metal spacer beads.
PIN O - LP, (3) 5x7mm beadcone, silver plated angel wings, 8x12mm gemstone, (3)4mm daisy spacers, (2)4mm pearls, 3mm smooth metal spacer beads.
***********************************************************************************
Set No.6
PIN P - SP, (4)6mm beadcaps, 8mm beadcap, 6&8mm pearls, 8mm faceted rondell bead, 4mm daisy spacer, 4mm smooth metal spacer bead. (Slimline pin, head approx 1.25" suit cards up to 5x7")
PIN Q - LP, 5x7mm beadcone, 12mm metal heart connector, 4&6mm pearl, (3) 3mm smooth metal spacer beads, (2)4mm daisy spacers, 6mm beadcap, 8x10 teardrop bead. (Slimline pin, head over 1.5", would suit any card size)
PIN R - SP, (3)4mm daisy spacers, 8mm faceted rondell bead, 6mm faceted round, 7mm beadcap, 5mm smooth metal spacer bead. (Slim pin, head approx 1", suit cards up to 5x7")
***********************************************************************************
Set No.7
PIN S - SP, (2) 4mm spacers, (4) 7mm beadcaps, 8mm glitter bead, 8mm pearl. (Small and chunky similar to Pin R).
PIN T - LP, 5x7 beadcone, (2) 6mm daisy spacer, (2)4mm daisy spacers, (3)6mm beadcaps, 8mm pearl, 8x11mm faceted teardrop bead, 3&4mm smooth metal spacer beads. (Slimline with head over 1.5", would suit any card)
PIN U - LP, 3&4mm smooth metal spacer beads, (2)8mm pearls, 4mm daisy spacer, (2)6mm daisy spacers, 6mm beadcap, 8mm faceted rondelle bead. (Slim pin, head approx 1.25", similar to Pin E & Pin P)
**********************************************************************************
And there we have it, 21 new designs for your delectation. I hope these new Pins will give you lots of inspiration and encourage you to have a go for yourselves. For those of you with the Starter kits, enjoy experimenting and creating. Don't forget to send me some pictures when you begin, I cannot wait to see them.
I will get the CASE card done for tomorrow, it looks like it's a toss up between Bev Rochester and Dena Concienne. I hope you'll pop by to find out, I so look forward to reading all your comments.
Take care of yourselves and pass on a smile today if you can.
Hugs Linda x
Thursday, 12 April 2012
Decorative Pins Tutorial
Today I am going to dedicate a post to my Decorative Pins as I have had so many questions about them here on my blog and also on other blogs I have commented on.
I started out using only long (5cm) dress makers pins but the trouble is as you practise and become less of a novice, you want to put on more beads and before you know it, the pins are much too short. So I searched the web for the best prices, as I wanted to buy a minimum of 250 pins. In the end I actually bought from a few different suppliers to test the quality and styling.
The longest pins that I found and my favourite, come with beads already on the head. I don't like them, personally, so I just cut through the beads using good wire cutters to remove them. Then I am left with just a 9cm steel pin. (No.1)
For this pin you have to prepare it by gluing a top bead on the pin and waiting for it to dry overnight before starting the actual decoration of your pins. If you don't want to do that then you can buy three other types of pins.
The first one is a pearl topped pin that is 7cm long and often can be found in different colours but I find white or ivory the best as they can be used with any other colour beads (though I usually cut them off too). (No.2)
A second alternative is to buy Decorative head pins from craft suppliers and just glue on extras to your liking. I will put a link to Sam's shop in the 'Places to shop' list below. (No.3)
The third alternative, is an actual jewellery making head pin that has been sharpened. Now these are wonderful as they have the flattened end to stop the top bead falling off. This means you can decorate immediately, HOWEVER they are not steel pins, they bend very easily and they are the most expensive. They come in both gold and silver finish and with protectors (if required) and in different lengths. (No.4)
For those of you who want protectors for your pins, you can buy earring backs (dome style) and they work perfectly, the proper protectors are very expensive (can be as much as 20/30p (USA 32/48c each). I tend to put all my pins into the adhesive of any flowers or ribbon on my card or even into the card of a matt/layer. I only use protectors if the pin is the embellishment itself.
Waste piece of acetate, old saucer or small tile........A few cocktail sticks...........E6000 glue............... Cotton cloth (eg; torn up tea towel) or kitchen roll-wiping up any glue.....Beads/Pins of your choice.
Drying your pin is best done with them upside down:- I use a couple of mini bulldog clips, a box with no lid, funky foam about 3in deep and as long as the box. Clip the foam to the outside of the box, and carefully slide the wet pins into the foam upside down as you make them, until the bottom bead touches the foam. This will help to keep the beads close together as they dry.
If you cannot find anything to pin them into upside down, then you can lay them out flat on an old cotton tea towel (do not move until they are dry or you may end up with gaps between the beads!)
Steal Pins:- Decide which bead you want as the top bead, this is better with a very small bead (seed bead or tiny pearl) or a bead with a small hole. Using the glue as described below, just glue on the one bead so that it covers the top of the pin (not the sharp end), slide the pins sideways into the foam to keep them flat as the bead dries. Leave untouched overnight to harden or at least 4-6hours. Do a batch of these ahead of time so you can get straight into the Decorating next time.
1. Prepare you foam or other drying equipment.
2. Design your bead on the pin without any glue. Then rest pin down while you get glue ready.
3. On a piece of acetate or old tile, squirt out about a petite pois pea size amount of E6000 (do not be tempted to put out more, it will start to dry quicker than you can finish your pin!)
4. With your left thumb at the end of the pin, slide the beads down to the bottom, out of the way (you can remove them all if you prefer and slide them on as you need them). Using the cocktail stick pick up a tiny amount of glue and wipe it around the area where the first bead will sit. Push the first bead up on over the glue. If a little seeps over, gently use a clean stick to wipe excess away or pull bead back down a little and replace by twisting to get the glue 'under' the bead. Now decide whether you want to glue every bead or perhaps every two or three beads. (I do all except any metal shaped beads- like wings etc). For each bead after the first, you can help create a stronger bond by putting a little of the glue onto the part of the bead that will attach to the previous one or where it will be hidden by a bead cap or spacer. You need to ensure you have glue on the pin and on the end of the bead that touches the next bead. Any 'strings' of glue are easily pulled away before or after drying so don't worry.
5. Continue gluing until all beads are in place then carefully keep the beads pushed together with your fingers and place into the drying position chosen.
6. Leave to dry overnight, without moving, or for at least 10-12hours to ensure a firm hold.
No.1 Pins Amazon.(My favourite and by far the cheapest)
No.2 Pins Amazon. (My second favourite)
No.3 Pins Creative studios (Sam Poole's shop has the Pins that Sue uses- shorter pins)
N0.4 Pins Sparkles (Easy to use, but bendy and a bit expensive)
No.5 Pins I have just found another site that sells 65mm pins with a pearl head click HERE to see what they have in stock.
Protectors EBay.
Glue No.1 (E6000) EBay (Always use a cocktail stick with this so you control the amount and can easily twist to remove any stringy bits. This one is my favourite as it's a thicker consistency and rubs off easily. The downside with this is that it does have an odour, but it doesn't bother me, so up to you)
Glue No.2 EBay, (A very good glue with no odour, but runny and sometimes you need alot to make a good strong bond on larger beads)
Spacer beads 3/4/5mm metal round silver or gold beads & metal filigree beads
Spacers 4mm or 6mm round flower decorative flat spacers are lovely though diamante rondells are lovely too.
Bead Caps/Cones 4mmx7mm cones for use with 6mm beads - 6/7/8mm caps to match size of beads you use.
Beads, Spacers, spacer beads and bead caps/cones are cheapest on eBay but alot of craft shops on line also sell them so have a look around and compare prices. I must be honest I buy bits and pieces from different shops within EBay and also from lots of on line shops like Beads Direct, Aldridge Crafts, Cuddly Buddly, Craftbag.co.uk, Beads Unlimited etc. etc.
Here are a few links to get you going, but please, please look around a bit; Ebay may be the cheapest but lots of craft shops have other wonderful alternatives too:-
Filigree Metal beads - Tebitan Silver wings (beads) - 4mm Silver Metal spacer beads - Silver & Black Rondell Spacers - Gold and Crystal Rondell Spacers - 7mm Silver Beadcaps - 5mm wide Silver Filigree Bead Cones (can be opened slightly for larger beads with plier-but be gentle. The bead only needs to sit 1-2mm inside it).
Last important note:- Try your first pin using inexpensive beads (esp glass ones, so you learn to glue heavier beads) and just four or five will do to get you used to the amount of glue needed and drying times etc. Like every other craft, it's about practice. You will eventually be able to use just about any bead and make something truly beautiful.
My next venture is 6inch pins for focal borders. Watch this space.
DECORATIVE PINS STARTER KIT
If anyone wants to try this craft, but doesn't want to buy the bulk packs of everything, contact me on the email below as I have starter packs that you may prefer to begin with. Then if you don't like it you haven't wasted a fortune. The kit will include everything to make a variety of pins, including some of the more expensive beads and metal hearts, connectors etc to give you a good idea of what making them will be like. All you need to invest in is glue. To start off you can always use Glossy accents as your glue (or jewellery glue if you have it) but I think the E6000 is the best investment if you are going to do more. (Please remember, glossy accents is very runny and so keep the pins pushed into something, hanging upside down, to let them dry or the beads will move).
If I can help with anything else, please don't be afraid to email me and I will see what I can do.
I hope today finds you well. I'll be back later with something a bit different.
Regards Linda x
I started out using only long (5cm) dress makers pins but the trouble is as you practise and become less of a novice, you want to put on more beads and before you know it, the pins are much too short. So I searched the web for the best prices, as I wanted to buy a minimum of 250 pins. In the end I actually bought from a few different suppliers to test the quality and styling.
The longest pins that I found and my favourite, come with beads already on the head. I don't like them, personally, so I just cut through the beads using good wire cutters to remove them. Then I am left with just a 9cm steel pin. (No.1)
For this pin you have to prepare it by gluing a top bead on the pin and waiting for it to dry overnight before starting the actual decoration of your pins. If you don't want to do that then you can buy three other types of pins.
The first one is a pearl topped pin that is 7cm long and often can be found in different colours but I find white or ivory the best as they can be used with any other colour beads (though I usually cut them off too). (No.2)
A second alternative is to buy Decorative head pins from craft suppliers and just glue on extras to your liking. I will put a link to Sam's shop in the 'Places to shop' list below. (No.3)
The third alternative, is an actual jewellery making head pin that has been sharpened. Now these are wonderful as they have the flattened end to stop the top bead falling off. This means you can decorate immediately, HOWEVER they are not steel pins, they bend very easily and they are the most expensive. They come in both gold and silver finish and with protectors (if required) and in different lengths. (No.4)
For those of you who want protectors for your pins, you can buy earring backs (dome style) and they work perfectly, the proper protectors are very expensive (can be as much as 20/30p (USA 32/48c each). I tend to put all my pins into the adhesive of any flowers or ribbon on my card or even into the card of a matt/layer. I only use protectors if the pin is the embellishment itself.
*************************
REQUIREMENTS (before you start)Waste piece of acetate, old saucer or small tile........A few cocktail sticks...........E6000 glue............... Cotton cloth (eg; torn up tea towel) or kitchen roll-wiping up any glue.....Beads/Pins of your choice.
Drying your pin is best done with them upside down:- I use a couple of mini bulldog clips, a box with no lid, funky foam about 3in deep and as long as the box. Clip the foam to the outside of the box, and carefully slide the wet pins into the foam upside down as you make them, until the bottom bead touches the foam. This will help to keep the beads close together as they dry.
If you cannot find anything to pin them into upside down, then you can lay them out flat on an old cotton tea towel (do not move until they are dry or you may end up with gaps between the beads!)
Steal Pins:- Decide which bead you want as the top bead, this is better with a very small bead (seed bead or tiny pearl) or a bead with a small hole. Using the glue as described below, just glue on the one bead so that it covers the top of the pin (not the sharp end), slide the pins sideways into the foam to keep them flat as the bead dries. Leave untouched overnight to harden or at least 4-6hours. Do a batch of these ahead of time so you can get straight into the Decorating next time.
*************************
HOW TO:-1. Prepare you foam or other drying equipment.
2. Design your bead on the pin without any glue. Then rest pin down while you get glue ready.
3. On a piece of acetate or old tile, squirt out about a petite pois pea size amount of E6000 (do not be tempted to put out more, it will start to dry quicker than you can finish your pin!)
4. With your left thumb at the end of the pin, slide the beads down to the bottom, out of the way (you can remove them all if you prefer and slide them on as you need them). Using the cocktail stick pick up a tiny amount of glue and wipe it around the area where the first bead will sit. Push the first bead up on over the glue. If a little seeps over, gently use a clean stick to wipe excess away or pull bead back down a little and replace by twisting to get the glue 'under' the bead. Now decide whether you want to glue every bead or perhaps every two or three beads. (I do all except any metal shaped beads- like wings etc). For each bead after the first, you can help create a stronger bond by putting a little of the glue onto the part of the bead that will attach to the previous one or where it will be hidden by a bead cap or spacer. You need to ensure you have glue on the pin and on the end of the bead that touches the next bead. Any 'strings' of glue are easily pulled away before or after drying so don't worry.
5. Continue gluing until all beads are in place then carefully keep the beads pushed together with your fingers and place into the drying position chosen.
6. Leave to dry overnight, without moving, or for at least 10-12hours to ensure a firm hold.
*************************
PLACES TO SHOPNo.1 Pins Amazon.(My favourite and by far the cheapest)
No.2 Pins Amazon. (My second favourite)
No.3 Pins Creative studios (Sam Poole's shop has the Pins that Sue uses- shorter pins)
N0.4 Pins Sparkles (Easy to use, but bendy and a bit expensive)
No.5 Pins I have just found another site that sells 65mm pins with a pearl head click HERE to see what they have in stock.
Protectors EBay.
Glue No.1 (E6000) EBay (Always use a cocktail stick with this so you control the amount and can easily twist to remove any stringy bits. This one is my favourite as it's a thicker consistency and rubs off easily. The downside with this is that it does have an odour, but it doesn't bother me, so up to you)
Glue No.2 EBay, (A very good glue with no odour, but runny and sometimes you need alot to make a good strong bond on larger beads)
Spacer beads 3/4/5mm metal round silver or gold beads & metal filigree beads
Spacers 4mm or 6mm round flower decorative flat spacers are lovely though diamante rondells are lovely too.
Bead Caps/Cones 4mmx7mm cones for use with 6mm beads - 6/7/8mm caps to match size of beads you use.
Beads, Spacers, spacer beads and bead caps/cones are cheapest on eBay but alot of craft shops on line also sell them so have a look around and compare prices. I must be honest I buy bits and pieces from different shops within EBay and also from lots of on line shops like Beads Direct, Aldridge Crafts, Cuddly Buddly, Craftbag.co.uk, Beads Unlimited etc. etc.
Here are a few links to get you going, but please, please look around a bit; Ebay may be the cheapest but lots of craft shops have other wonderful alternatives too:-
Filigree Metal beads - Tebitan Silver wings (beads) - 4mm Silver Metal spacer beads - Silver & Black Rondell Spacers - Gold and Crystal Rondell Spacers - 7mm Silver Beadcaps - 5mm wide Silver Filigree Bead Cones (can be opened slightly for larger beads with plier-but be gentle. The bead only needs to sit 1-2mm inside it).
Last important note:- Try your first pin using inexpensive beads (esp glass ones, so you learn to glue heavier beads) and just four or five will do to get you used to the amount of glue needed and drying times etc. Like every other craft, it's about practice. You will eventually be able to use just about any bead and make something truly beautiful.
My next venture is 6inch pins for focal borders. Watch this space.
DECORATIVE PINS STARTER KIT
If anyone wants to try this craft, but doesn't want to buy the bulk packs of everything, contact me on the email below as I have starter packs that you may prefer to begin with. Then if you don't like it you haven't wasted a fortune. The kit will include everything to make a variety of pins, including some of the more expensive beads and metal hearts, connectors etc to give you a good idea of what making them will be like. All you need to invest in is glue. To start off you can always use Glossy accents as your glue (or jewellery glue if you have it) but I think the E6000 is the best investment if you are going to do more. (Please remember, glossy accents is very runny and so keep the pins pushed into something, hanging upside down, to let them dry or the beads will move).
*************************
Well that's it I think. I am sorry it was such a long post but I wanted to get down as much as possible to help those interested in making their own. They are not hard to make at all and I love to spend a evening in front of the TV just designing my pins. I usually do about 40/50 at a time now. Look in the sales and charity stores for old jewellery that can be broken down for beads etc. and don't forget your jewellery boxes!!If I can help with anything else, please don't be afraid to email me and I will see what I can do.
I hope today finds you well. I'll be back later with something a bit different.
Regards Linda x
Subscribe to:
Posts (Atom)