Showing posts with label Spellbinders packaging. Show all posts

Friday, 17 August 2012

Decorative Pins Slider Box Tutorial

Hiya,
It's really good to be back with you again today.  As promised I have another tutorial for you.  It may not be for all of you, but I hope it will be useful to some.
Todays tutorial is to create a Slider Box for your Decorative Pins (though it could be adapted for other uses).

Here is the finished article.


and all its components.

Once I had designed the box to suit my Fancy Decorative Pins, I used the fabulous Spellbinders packaging (again, you say?  Yes, it's becoming an essential piece of my kit!), to make a template.  Much easier than measuring when you have several to make and I had 15 to do straight off ready for giveaways and Candy prizes.


 1.  Cut out the Box Slider 18.4cm by 10.3cm. Score from each end, along the width, at 1.25cm, 2.5cm and 3.75cm.  Then along the length at 1.25 on both sides.   (Here you can see the acetate template I made on top of the card already cut to size.)


2.  Cut down the score line of the long sides until you reach the 3.75cm score line on all four sides.


3.  Fold the long sides up and push the cut flaps into the center. Next, fold over the shorter ends to encapsulate the end flaps and secure the box.


4.  Cut the Box Slider liner to 7.6cm by 10.2cm

(Please, please, please excuse my awful writing, I was rushing when I created the templates and didn't have the time to produce tidier ones to show you.  I didn't want to risk leaving it until another day incase I was away from the blog again for a short while)


5.  Cut the Box Slider Pin Holder to 7.6cm by 11.2cm.
Score at 1.6cm (Sorry, I've just realised I wrote 1.5 on the template) and at 2.8cm and 4cm.
Fold the 1.6cm and 4cm scores as valley folds and the 2.8cm score as a mountain fold.

6.  Attach the Pin Holder to the Box Liner up to the 4cm fold.  Next attach only the 1.6cm piece to the base of the Box Liner allowing the extra card to form a mountain in which to secure the pins.


7.  Cut out the Box Outer Slider to 10.6cm by 19.7cm.
Score, from one end, at 0.9cm, 9cm, 10.25cm and 18.4cm.
If you want an aperture, decide on the diecut shape you want and position so the center is at approx 4cm (or to suit your needs).


8.  Cut a piece of acetate (recycle that Spellbinder or other packaging again) to fit inside the box and glue it in position along the bottom and top edge.  This acetate acts as a perfect window in the aperture, but it also strenghthens the box and stops the pins from damaging the box front.


9.  Finally Glue the shorter flap behind the opposite end flap to form the Outer Cover, press firmly from inside to secure.

Now to the adhesive.  I used Redline tape for securing the Outer cover but a wet glue could just as easily be used.  For the acetate, I used a simple 3mm tape and for the inner Pin Holder and liner, I used a few drops of wet glue.


I have displayed the finished box with only four pins, but it will infact hold up to seven pins; it depends totally on the size of the beads used.  I have made up a few of these boxes ready for gifts or Candy and also to store some of my own pins.  They provide much needed protection if I have used speciality beads on my pins and it stops the pins rubbing together.
Well, there we have it, another Tutorial complete.  I do hope it will be of some use to those of you who love to make pins as I do and also to those who are going to have a go sometime soon.
I will be around blogland again today, trying hard to catch up with you all.
I hope you have a wonderful day.    Best wishes Linda xx

Thursday, 16 August 2012

Tutorial as planned

Good morning all,
Well at last I managed to find enough time to get to the craftroom and do the tutorial I planned.  Infact I have done two, so look out tomorrow for the second one!  I have included this with all my Tutorials for future reference.  Just click on the Tutorials Tab at the top of my home page and you will find a myriad of useful and helpful ideas, not only from myself and also from other crafters that have really impressed me.

Todays tutorial is simple but so useful and it is a bit of upcycling too.   So what is it?  Well, do you remember the last card I made?  Ok, no jokes now, it's not been that long...LOL!!  I used this technique to create that card.  Here's a reminder for anyone that may have missed it....


What I want to show you is another way to use your packaging from Spellbinders or other flat acetate packaging;   and it includes using the dies that came in the packaging too!  So two birds, one stone scenario, good aye!

When you cut your packaging from the dies take care to cut it as close to the curves as possible to create the biggest flat sheets of acetate as possible, it makes it easier for larger dies.  Now all you have to do is decide which shape you want to cut first.


USING THE APERTURE OR WASTE PIECE

Step One:  Cut your die shape from the acetate.  Try to center your die on the acetate before putting it through your GC, Cuttlebug, Big Shot etc; this will be beneficial when using the template.
(Sorry about the glare on the acetate but I had to have it so the acetate would show up.)


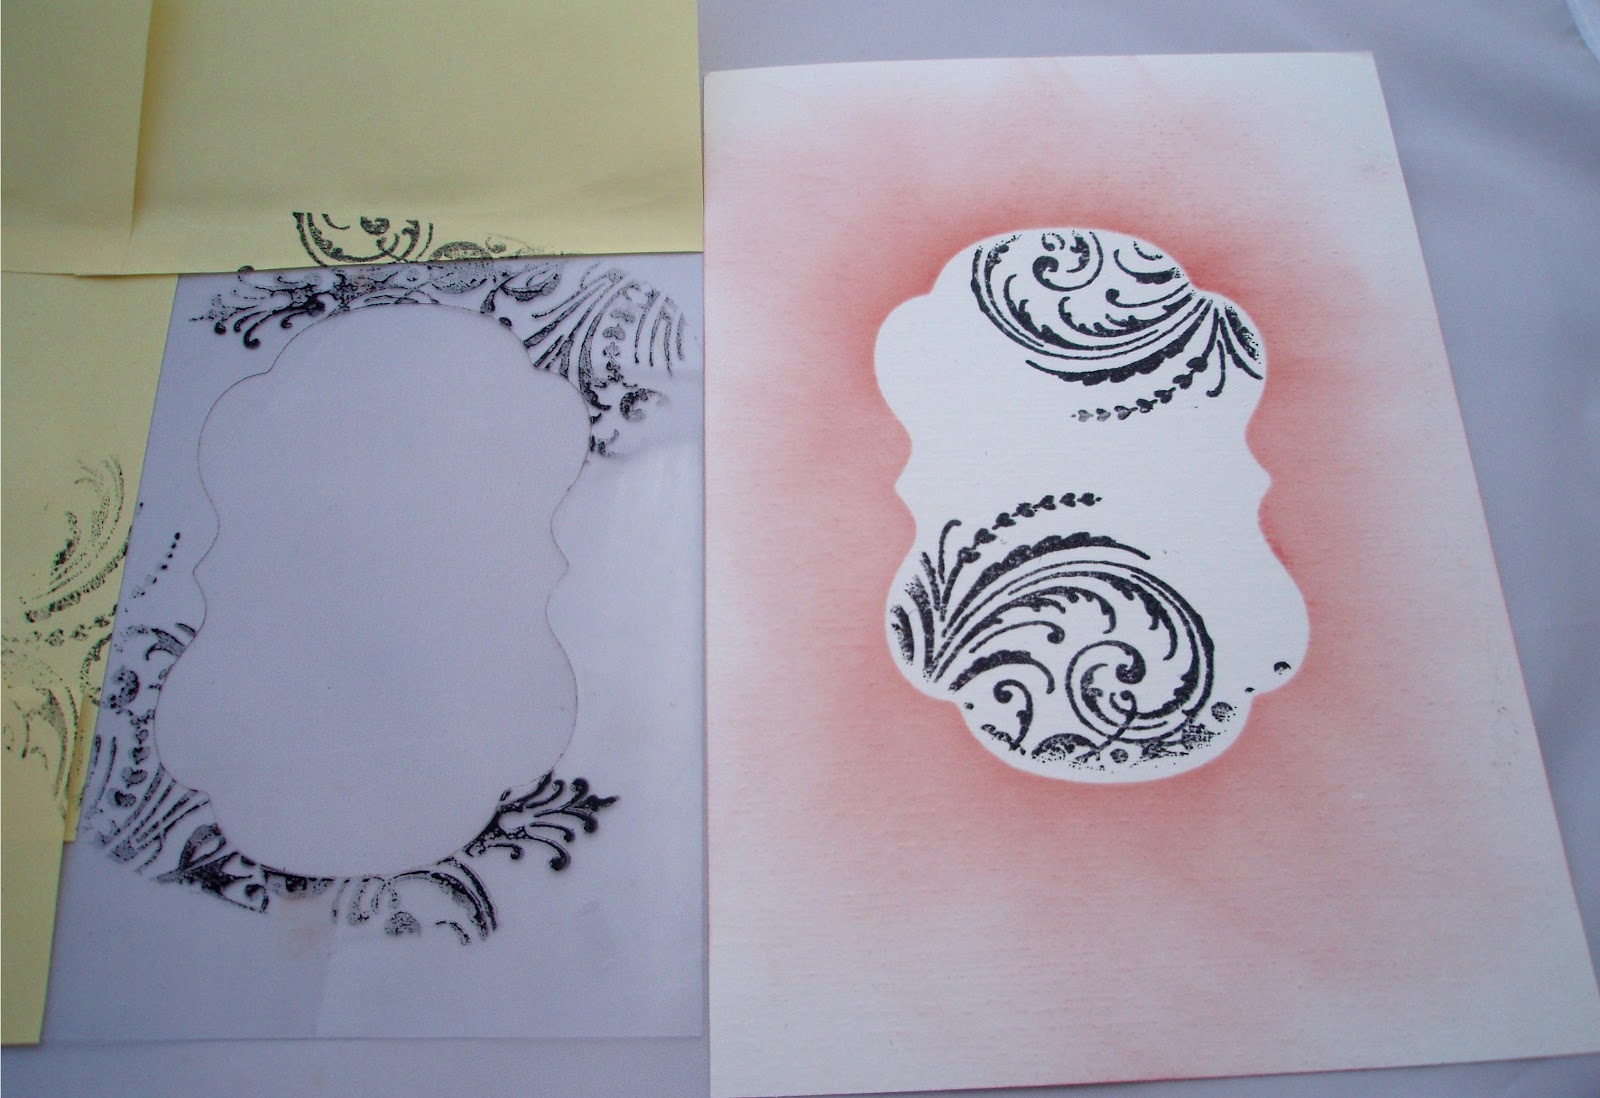
 Step Two:  Adhere your acetate in the correct position using tiny bits of removeable tape. I then used some sticky notes to protect any uncovered cardstock.  Next, using your preferred tool, apply your ink of choice and swirl it through the aperture until the required depth of colour is attained.  Add deeper tones to the outer edges if you want to create a center soft focus effect.  (Sorry mine is shown after I have stamped as I forgot to photograph it before!)


Step Three:  Remove the acetate and then stamp over the ink shape with your chosen stamp.  Take care to clean your acetate now with a wet wipe or just a damp cloth, dry and store till next time.
   STORING YOUR TEMPLATES.  Write the die name on the acetate with a permanent marker and store them in polypockets in an A4 file.  Arrange them in the same order as your dies are stored to make searching easy.


USING THE DIECUT SHAPE

Step One:  Adhere the acetate diecut to your chosen cardstock with tiny bits of removeable tape and then with your ink applicator apply the ink all around in a small circular motion or with outward sweeping strokes.
(I have done this purely for the demostration not for an actual card, so it is unfinished)


Step Two:  Remove the die to expose the open shaped area and clean the acetate with a wet wipe or damp cloth.  Dry and store as above.


Step Three:   Using your Aperture (waste) piece of acetate, place it over the shape and stamp through the aperture, taking care to press all over the stamp to ensure the image reaches the outer edges.


Step Four:  Remove the acetate, clean as before and then use your finished design as desired.  (I am going to cut mine down now to enclose all the red inked area and use it as a backdrop to a sentiment on a Spellbinders Fancy Tag) Perfect, a background and matt all in one!


I do hope you like my little tutorial and will have a play yourself.  It is wonderful the things you can do with bits of old plastic, ink and some inspiration.  I'd love to see what you do, so maybe you could let me know if you use this techinique at any time and I could take a look.

Well, have a good day and stay crafting!! (Oh lord, I am getting to sound like Bruce Forsyth.....LOL!!)   See you soon   Linda xx